Thursday, November 8, 2012

Tortilla soup

This is a wonderful, traditional Mexican dish.
Sometimes I make tortilla soup with chicken, and sometimes without.
We start by cutting corn tortillas into strips, cutting along the grain of the tortilla.
Set aside the tortilla strips.
Next, boil chicken breast meet, and keep the resulting chicken broth for the soup.
Add two cubes of tomato bullion to the broth.
Shred the cooked chicken breast into bit sized pieced and set aside.
Fry the tortilla strips until crispy, making sure not to burn them.
Take one large tomato or two small tomatoes and  one quarter of an onion, four cloves of garlic,  and a cup of the chicken broth you have mixed with tomato bullion and blend together.
Pour blender contents into a hot pot, preparing the pot first with just a touch of olive oil.
Let the mixture heat up. This seasons and cooks the tomatoes.  
Bring the mixture to a light bubble, and add the rest of the chicken broth.
Let soup simmer for a few minutes. Add salt to taste.
Now, prepare individual servings with soup, chicken, and on top, add the crisp tortilla strips.
Garnish with crumbled Mexican cheese, sour cream, avocado, and cilantro.
Add hot sauce if desired.

This is a light, yet filling meal. Our family loves Tortilla soup for lunch, or a late dinner.


Saturday, October 13, 2012

Julie’s Steak Tacos


This taco recipe is my personal masterpiece.
I am always asked if these are “authentic” Mexican tacos. Tacos in Mexico are different from hamburgers in a fast food restaurant chain. They will all be a little bit different. Some will be better, and some worse. Some are great, some are no so great.
I think that my process for making tacos will be very familiar to anyone who’s ever had or made tacos in Mexico. So yes, these are authentic Mexican tacos.
People come to our house in hopes that I will be preparing these wonderful tacos.
I’ve been asked to make these tacos for the special dinner high school kids plan for the prom.
Whenever there is a special occasion in my family, everybody reminds me that I need to plan to make my tacos.
The meat I use in these tacos is New York Steak. I grill it, cube it, and grill it again. I only season the meat with a little salt. If the meat isn’t prepared on a grill outside, then I grill the meat in its own juices.
My salsa makes this meal complete. Making salsa is the sentimental part of this recipe, because of the smells that fill the house. My kids tell me that’s their favorite part of having tacos.
Mexican women take great pride in their salsa recipe and it is something that is very personal. Although I have taken inspiration from many special women in my life, I can honestly say that my salsa recipe is my very own.

Here’s what you’ll need:

Roma tomatoes.
Anaheim peppers
1 White onion
Limes
Salt
Good quality steaks
White corn tortillas

The tomatoes and the peppers must be grilled until the skins are black.
The onions needs the first layer peeled, and then I wrap it in aluminum foil. Then I put the wrapped onion in the oven at 350 degrees for about twenty minute.
Now take the grilled tomatoes and peppers and onion, and dice them finely. Make sure not to lose any of the juice. Put them all together in a dish, and add salt and one lime’s worth of juice.

Salt the steaks and lightly oil the pan, if you’re grilling on the stove. Grill the steaks and then cube them. You need little, smaller than bite size pieces. Then put the little cubes back in the pan for a light finishing.  

Put a handful of white corn tortillas in a zip lock bag and microwave them for a minute or two. Or, wrap them in a moistened dish towel. This makes the tortillas soft and pliable.

I load the tortillas with the cubed steak pieces, and then deliver them to the table. Two or three tacos for each person at the table. Each of us at the table spoons up as much salsa as we want on our tacos. I keep Tapatio hot sauce on the table so that people can spice up their tacos a little more if they want.

One of the keys in making these tacos is making enough.  People always want more.


Wednesday, October 3, 2012

My first Dog

Bruno. His name is Bruno. Bruno is a Mini Schnauzer.
I never thought we would ever welcome a puppy into our home. But now here he is. I didn’t have dogs when I was growing up, so this is my first experience with any pet.
My daughter has been pressuring us for about a year to do this. Her siblings are leaving the house one by one, and she told us that she couldn’t bear the thought of being alone.
Our other children had all asked us for a dog many times while they were growing up. We never gave in to any of their pleas.  But this seemed different. Lalli even put together a Power Point presentation explaining why she should have a dog.
I admit my emotions got the best of me, and it really seemed like the right time to do this.
We worried about a dog pooping in our house. We worried about a dog chewing up our belongings.  We worried about a dog changing our lives and limiting how much traveling we could do in the future.
Yes, there were moments that tried our patience. He wanted to bite us all the time, and those puppy teeth are sharp as razors. And yes, he did require constant supervision. We learned that we couldn’t just take the family out to dinner anymore. We went and got hamburgers a few times and at them at the park. Traveling in the future will require finding someone to watch the dog.
But it was really an amazing experience. We had studied all about what to do when you have a new puppy, and we did it all by the book. There were very few accidents in the house.  We took him out about ever y two hours, and right after he eats or wakes up from a nap. Lots of fun toys and playtime have kept him from getting bored and into trouble.
We’ve learned that frequent walks and consistent discipline are very important. He’s a smart little dog, and he seems to understand what we want from him.
I’ve got to tell you, I love that little creature. Bruno has brought a lot of love to our home. He has made a difference in our children’s lives and in my life too. There’s just something about having a dog get all excited to see me when I get home. And there’s nothing like that moment in the evening when we all sit down to watch a show and Bruno wants to curl up in my lap and sleep.
I guess I’m a dog owner now.


Thursday, September 6, 2012

Grandma’s meatloaf

This recipe always makes me think of “Everybody loves Raymond”.
Meatloat is one of the dishes that fascinated me when I came to the United States in college. I wanted to learn authentic American recipes. I learned this recipe from my mother in law, but it took me years to get it right. I sometimes wondered if she had given the recipe wrong on purpose just to keep me from taking credit for her delicious meatloaf!
From the beginning and for a long time, my meatloaf turned out very flat. I may never know why this happened.  But now it turns out great every time.
Here’s the recipe:
You’ll need one pound of ground beef
One and a half slices of bread (whatever kind you like)
One egg
Salt and pepper
Steak sauce or ketchup
2 table spoons of chopped onions
One cup of milk.

Add a raw egg to the ground beef. Whip the egg a little before adding it. Then mix it vigorously together.
Now vigorously mix in a cup of milk.
Salt and pepper the mixture to taste.
Now mix in about 2 tablespoons of chopped onions.
Finally, mix in about a tablespoon of steak sauce, or ketchup, or a little of both.
Now crumble in your slice and a half of bread. It’s better if the bread is a little stale. Sourdough bread gives it a great flavor. You can experiment with different kinds of bread.
Mix it all in well.

Now bake it.
I like glassware, in an appropriate rectangular shape.
Spray some cooking oil in the corners so the corner don’t stick.
Now, don’t man-handle the uncooked meatloaf, just gently arrange it in the pan.
Then cover the pan with aluminum foil.
Cook the meat loaf at 350 degrees for 45 minutes.

It should turn out perfect. Let me know if you have any variations.


Thursday, July 19, 2012

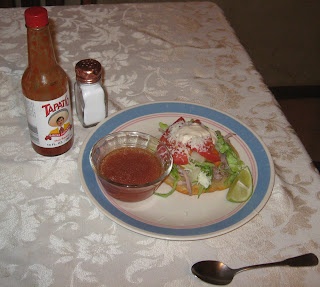
Tostadas !!

This recipe is very similar to some of my other recipes, but in Mexican food, Tostadas are a unique plate.
Some of my Mexican recipes are for special occasions. Tostadas are more for every day kinds of meals.
I begin this recipe by boiling a nice rump roast in water, with a piece of white onion, salt and pepper. I let the roast boil for up to three hours.
Then I shred the roast in to fine, bite-size pieces.
Once I have my meat prepared, I begin with the tortillas.

Start by toasting the corn tortillas by frying them in oil. You want them crisp but not burnt. Now they are tostadas, and not tortillas anymore.  Set them aside.
Then I like to boil carrots and potatoes. I put chicken bouillon in with the boiling water.
The carrots and potatoes are cut into cubes.
I put the carrots in the boiling water first, because the potatoes take less time to cook.
I boil the veggies for 5 or 10 minutes, or until soft. The veggies need to be soft.
Drain the veggies and set them aside.
Add two cans of tomato sauce to the broth that was left over after boiling the roast. This juice will top the tostadas when we’re done.
Now we put together our tostadas.
Sometimes I start by spreading re-fried beans on the tostadas. I don’t always do this, but it’s good with the beans.
Then add a nice pile of shredded roast on the tostada.
Then add a layer of fresh shredded lettuce.
Then add your boiled veggies.
Top with grated cheese of your choice, and half-cream. ( I use Mexican cream).
At the table, add hot sauce to taste, and have each dinner guest spoon on the juice (broth) that has been served to each diner in a nice cup.
Tostadas! 
A fantastic Mexican meal.


Wednesday, July 18, 2012

The Oaks

This is the most beautiful setting for a restaurant I have ever seen. Our family has a summer tradition to spent time here as much as we can. The food is great. The menu is mostly sandwiches, soups, salads, and burgers, but the dining experience at The Oaks is very special. This is not fast food. The quality is superb.

The Oaks is located a few miles up Ogden Canyon.  Ogden Canyon is beautiful any time of year.  The outside tables are set in little kiosks among the trees. There is also inside dining during the winter. The Fall is spectacular with all the colors. Summer is cool on the patio next to the Ogden River. The sound of the river going by is very soothing. There are hummingbird feeders at the tables and you can just about count on a visit from these wonderful little birds. The ice cream here is famous, and many people come here especially for the ice cream. We usually have ice cream after dinner.


Don’t miss this special dining experience.  


Wednesday, July 4, 2012

Chips and lime.

This is possibly the most important entry on this blog.
Chips and line are a STAPLE food in our house. If we’ve rented a movie, if it’s someone’s birthday, if someone’s coming to visit, if someone needs a snack, ANYTIME I can think of, someone in my family will make chips with lime.
Nothing, and I really mean nothing, could ever be more simple than this. But you’re going to love it. Anybody who’s ever tried chips and lime in my house has gone on to make it regularly in their own house. Many people tell me they make chips and lime better than I do now.
We’ll see.
This is a Mexican treat, and this is the way folks in Mexico like to eat potato chips. In fact, many bags of chips in vending machines or at convenience stores in Mexico, come with little foil packets of lime juice and hot sauce.
People who try this in my home return to their own homes and try to make Chips with Lime almost immediately. So I’m going to teach you. Pay close attention:

Here’s what you do:
Step One: Get a bag (start with a regular family size bag) of REGULAR potato chips. (This recipe can be done with corn chips, but I believe that makes this an entirely different recipe).
Step Two: Dump the bag of chips into a large serving bowl.
Step Three: Cut a lime in half and squeeze it over all the chips.
Step Four: Generously squirt hot sauce over the whole mess. We like Tapatio hot sauce, but I relucantly will tell you that you can use any hot sauce you like.


Now, at this point, I consider the chips ready for consumption. But my kids disagree. Each one of my kids have developed their own take on chips and lime. When my sons make chips and lime, they put a plate over the serving bowl and shake it all up to evenly distribute the lime and hot sauce.


Finally, remember these Chips with Lime rules:
You can’t use lemons.
You can’t use powdered chili.
You can CHOOSE how much lime to use and how much hot sauce to use.
You can CHOOSE how much to shake them before serving.
You MUST share.